Wednesday, July 29, 2015

Autonomous Mozilla Stumbler with Android

Mozilla Location Service (MLS) is an open source service to determine location based on network infrastructure like WiFi access points and cell towers. The project has released an client applications to collect the large dataset of GSM, Cellphone, WiFi data using crowd sourcing. In this blog post I'll explore an idea to re-purpose an old Android mobile phone as an autonomous MozStumbling device that could be easily deployed in public transport, taxis or your friend who is driving across the country.

Bill of Materials

  1. Android Mobile phone.
  2. Mozstumbler Android App.
  3. Taskbomb Android App.
  4. Mini-USB cable.
  5. GSM SIM (With mobile data).
  6. Car lighter socket power adapter.
  7. Powerbank (optional).

Putting it together

In this setup, I am using a rugged Android phone running Android Gingerbread. It can take a lot punishment. Leaving a phone in overheated car is recipe for disaster.

From the Android settings I enabled allow installation of non-market applications 'Unknown Sources'. Connected the phone to my computer using the Mini-USB cable. Transferred the previous downloaded apps(.apk) packages to phone and installed the Mozstumbler and Taskbomb applications.

Android homescreen showing Mozstumbler and Taskbomb icons

Configured the Mozstumbler application to start on boot with Taskbomb app. Also configured Mozstumbler to upload using mobile data connection. The phone has GSM SIM card with data connection. Made sure both WiFi, GPS and Cellular data is enabled.

To prevent phone from downloading software updates and using up all the data. I disabled all software updates. Disabled all notifications both audio and LED notifications. Finally locked by phone by setting a secret code. Now the device is ready for deployment. The phone is plugged into car's lighter charging unit to keep it powered up. You can also use a power bank in case where charging options are not available.

Planning to use this autonomous Mozstumbler hack soon. Perhaps I should ask Thejesh to use on his epic trip across India.

Saturday, July 25, 2015

Restoring Nexus 4 Factory Image

Something terribly went wrong during Android 5.1.1 Over The Air (OTA) update. The Nexus 4 mobile phone stuck in the boot loop after update. Perhaps the update failed to download the files or the device ran out of disk space. For those of you who like to debug such problems, I captured some logs for analysis with 'adb logcat' here (1,2,3,4).

Caution: Flashing a new factory image deletes all user data. Be certain to first backup any personal data such as photos.

Tools: What do you need to restore the phone?

For this tutorial I'll use a gnu/Linux computer with Android SDK Stand-alone Tools installed. We'll use the 'fastboot' program to flash the Android Nexus 4 devices with factory images from developer.android.com/nexus/images.

  1. Download Android SDK Stand-alone tools from developer.android.com.
  2. Uncompress the Android SDK to your /opt/android-sdk-linux directory.
  3. Add Fastboot to your system path
    
    $ ln -sf /opt/android-sdk-linux/platform-tools/fastboot /usr/local/bin/fastboot
    
  4. To get Fastboot working on gnu/Linux I added the follow line to /etc/udev/rules.d/51-android.rules .
    
    $ sudo nano /etc/udev/rules.d/51-android.rules 
    
    # adb protocol on mako (Nexus 4 debug)
    SUBSYSTEMS=="usb", ATTRS{idVendor}=="18d1",ATTR{idProduct}=="4ee2", MODE="$
    
  5. Restart udev service.Connect the Nexus 4 device to computer with USB cable and see fastboot can access it.
    
    $ sudo service udev restart 
    $ sudo fastboot devices
    
  6. Unlock the Nexus 4 phone (Optional step). The phone will reboot and follow the instructions on the phone screen to unlock the phone.
  7. $ fastboot oem unlock 
  8. Let's put the Nexus 4 in recovery mode so that we can flash the new factory image. You can use 'adb' command or press hold volume up + volume down + power buttons during the phone bootup.
      
    $ adb reboot bootloader
    
  9. Download the Nexus 4 factory image from developers.google.com/android/nexus/images. I have downloaded the Android 5.1.0 (LMY47O) factory image. Uncompress it the downloaded file and excute the 'flash-all.sh' script to flash the factory image.
    
    $ tar zxvf occam-lmy47o-factory-cae68e81.tgz 
    
    $ cd occam-lmy47o/ 
    
    $ sudo ./flash-all.sh 
    

Whew! That's all folks! Now you get enjoy the Nexus device with brand new factory image.

Wednesday, July 22, 2015

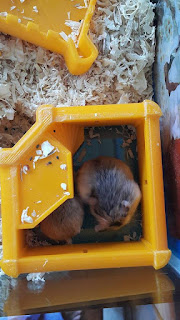
3D Printing Hamster Castle

They say there is no greater noble deed than 3D printing castles for homeless hamsters. Hackerspace Phnom Penh's Leo Jofeh set upon himself the noble task of designing and printing a Hamster Castle on Lulzbot Mini 3D printer. The project took over three hours to print the walls and another 2 hours for the roof and ramparts.

Hamster castle 3D print result
Hamster Castle 3D print complete with roof

The following timelaspe video shows 3D printer in action. The timelapse was captured on Sony RX100 MKII in WiFi mode with TimeLapse Android app.

It looks great and the hamsters have made themselves at home!

Hamsters in the 3d printed castle
Hamsters sleep in the 3d printed castle
Hamsters in the 3d printed castle

Saturday, July 18, 2015

Webmaker tools on Raspberry Pi

Last year in Bamako, Mali I watched the participants struggle with slow Internet connectivity during a web literacy WebMaker event. I thought it is very important to make Webmaker tools available offline on a local server. I started working on a custom Rasbian based SD-card image with Mozilla Webmaker tools on Raspberry Pi. The setup uses the most minimal setup without any connectivity to Internet. The Raspberry Pi Server will host Web maker tools like Thimble with some learning templates. The users could connect to the server with WiFi from their laptops or using school computers using local Ethernet connection.

The goal was to finish the project by MozFest East Africa in July, 2015 and release it for testing.

How to use Webmaker tools on Raspberry Pi?

Download the testing version of the image here. It is large 2.8GB file, it will take some time to download. In this setup I am using an older Raspberry Pi B model with 8GB SDCard with a TP-Link TL-WN322G+ USB WiFi dongle. The WiFi dongle is optional, you can connect the Raspberry Pi to your router or networking hub with an Ethernet patch cable.

  1. Download and write the image to the SD-card (Tutorial)
  2. Boot the raspberry Pi with the SD-card
  3. Connect the Raspberry Pi to your local Ethernet network. (If you have USB Wifi dongle then you can connect to 'Webmaker' WiFi network with 'raspberry' password.)
  4. On your computer, Open browser and type 'http://webmaker.local' You should see the Thimble App UI.
Webmaker Thimble running on Raspberry Pi server

Please do report any problems and bug reports!


Popular Posts